Saturday, July 27, 2013

Another Trash to Treasure project


Just found this little wooden tray in a junk store and had a vision for it.  First of all, it's solid wood.  That in of itself makes it worth the effort.  All painted up and detailed, it could serve as a place to throw "stuff", jewelry or whatever....
Before:

               It's actually pretty cute, but needs some art work added to it.

Supplies:

Sandpaper
latex paint
Acrylic paint
Clear Gloss Spray
Valspar Black Glaze

Step #1.
 Paint the tray with two coats of latex paint.  I picked a yellow color.
Step #2
I painted the entire tray with a black glaze and then wiped it off. Love the idea of adding black glaze that can seep into the crevices and give the piece an aged look. Now for some color.


Step #3
Add color.  Here I used acrylic paint to fill in the grapes and a few leafs. Work in progress here.  Only one side done so far.


Step: #4
Apply several coats of glossy varnish.  I'm giving it several coats so that it's durable enough to throw change and "things" into. The color in the photograph is slightly off.  It's more like the photo above.  Came out really pretty.

I love turning junk or trash into something useful!!

Christy


01 02 12

Thursday, July 11, 2013

Trash to Treasure

Turning the simplest item into something that you love! Sometimes it feels so good to change the look of something and transform it into something completely different. I seem to land up doing this all the time.  Make it new, fix it up, change the color or even the style.

This candlestick was about to be dumped into a landfill somewhere.  It was old, scratched and pretty ugly.  I'm not really sure what it's made of, but it feels like a resin.

I sanded it lightly, which is something that pretty much gets done every time something comes home.  If it's getting painted, then it's getting sanded.  The paint adheres to the item so much better when it's sanded first.

Painted with a brush and using a latex paint, I picked an old "blue" color.  Behr paints make these little containers of "sample" paint that is sold at Home Depot.  You can have them mix up any color from a sample and have these great paints at home for all sorts of projects.  I picked up 5 cans ($2.00 a piece) in blue,  light green, gold, pink and purple.  I use these all the time as a base coat for a Shabby Chic look.

After the candle stick was dried I applied a coat of black glaze and quickly wiped it off with a clean, dry rag.  I bought a can of black glaze at Lowe's.  Valspar makes it.  They mix it up in the store.  $18.00 a can, but lasts forever.

I added the vintage graphic (just for decoration) and tied it up with jute. The graphic I got from the The Graphic Fairy.
 The landfill piece is now nice enough to actually display.

From trash to treasure: for sure!

Christy


01 02 12

Thursday, July 4, 2013

Redux: Rocking Horse

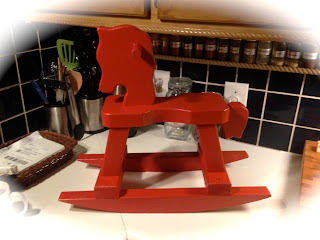
This was a quick and easy project that surely proofs that one man's junk is another man's treasure.

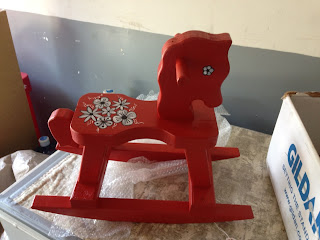
Something that someone had no use for landed up with me and I created a cute, useful item.  I don't have any little ones anymore so I'm selling this to someone that has children around (or maybe not).  I also think it would look darling out on a porch with plants on it!  I purchased this at a thrift store for 4 bucks.  Solid natural wood and well made.  It was spray painted and left in the sun to bake dry.
 I had some stencils at home that were used for painting glassware so I used them to outline a bunch of flowers on the seat of the horse and two for the eyes.
White seemed like a good color with an outline of black.  All hand painted with acrylics. I thought it came out pretty cute.  Hope someone finds it a new home.  I love searching around for items that I have a vision for.  This little guy fit the bill!

Hope everyone has a safe and fun Fourth of July!

Christy
01 02 12

Monday, July 1, 2013

Decorating Storage Containers

I have a bunch of these plastic and glass canisters that are great for storage, but boring to look at. I decided to store laundry detergent in one, fabric softener, doggy treats and a collection of buttons for the sewing room in the others. 
Adding graphics printed off the computer and adhering them with Mod Podge seemed like a good idea, so I gave it a shot. I like the vintage look, so I looked around for those types of images.  

Here's the problem.  Where do you get good graphics for free?

The Graphics Fairy, of coarse!


She has the best images around and they are all FREE.  Free images are not easy to find these days, but she has plenty.  Just about anything you want is on her site.  You can look through the collection (all by subject) and pick an image.  Download and print.  It's that easy.

All these images are from her site.  Here are two for the laundry room containers.  These are vintage images in sepia tones. I applied Mod Podge (matte finish) to the printed picture and placed it on the container. 
After the print is dry, I applied another coat to the top to seal it. 

Here's another laundry soap container.

Doggy treats and buttons.
Love the look of these containers all decorated and they look great out on a shelf.

Christy


01 02 12